Augmented Objects
- Due: Tuesday Nov 26. No late work.
- Individual Project
- Submit to: DioT 2019: Augmented Objects
| Milestone | Concept | Due |
|---|---|---|
| 1 | Complete a Co-Design Process | Nov 12 |
| 2 | Develop a conceptual design | Nov 14 |
| 3 | Implement an experience prototype | Nov 21 |
| 4 | Package your concept; consider design responsibility | Nov 26 |
| 5 | Reflect and report | Nov 26 |
Introduction
But what does it mean to “connect an object to the Internet”? Clearly, sticking an Ethernet socket into a chair or a 3G modem into a sewing machine doesn’t suddenly imbue the object with mysterious properties. Rather, there has to be some flow of information which connects the defining characteristics of the Thing with the world of data and processing represented by the Internet.
From: Designing the Internet of Things by Adrian McEwen & Hakim Cassimally
As part of this first project, you’re going to get in deep with this heuristic of what it takes to design a good IoT product: the idea that the characteristics of the Thing in the world - be it the material, functional or relational affordances - is sensibly related to what it connects with.
This project builds on your fieldwork assignment and asks you to you speculate about the meaningful relationships between physical objects and connectivity by prototyping a new smart and enhanced object. Building on many of the readings, you’ll also examine opportunities for the IoT to engage with “non sterotypical homes” and consider how devices interact with and engage us in domestic settings. Here you’ll be encouraged to find non-traditional, alternative and hyper-personalized (rather than a general purpose or mass-market product) for the home.
You’ll work with people in real homes to identify potential opportunities to create bespoke IoT solutions and leverage the potential of a platform like Particle to empower you to quickly prototype, hack and tinker to develop alternative or customized solutions to non-traditional problems. You’re encouraged to look beyond the obvious immediate things you could augment in their homes (e.g. to remotely turn on their sprinklers, to hack their coffee pot to brew at the right time in the morning, or get their dishwashers or washing machines text them when the cycle is finished, or track the number of times their fridge is opened each day) to something that adds real value for just one person in the home that you’ve selected.
In summary: build a bespoke solution for one home, that creates meaningful value through ‘enchantment’, internet-connectivity and rapid prototyping.
Learning Objectives
As part of this assignment you’ll be asked to:
- Explore opportunities for connectivity and personalization that IoT prototyping platforms, like Particle, bring.
- Develop your working knowledge of circuits and electrical components
- Work collaboratively to explore, design, develop and program an experience prototype;
- Embrace tinkering and hacking and develop a prototype connected solution;
- Explore key concepts of value-creation and strategies like ‘enchantment’ for IoT product design through hands-on exploration
Primary Precedent: Homesense
Homesense is a cross-European research project that explores the Internet of Things through human centered methods and technology probes.
Homesense
The project is described as follows:
Initiated in 2009 by Tinker London, Homesense project is an open research project on the topic of smart homes.
Smart homes have generally been more successful in concept than in execution or in-home use. This problem is usually not one of technology, but of interaction and interface design–we can build a Smart Home, but who wants to use it? And how do they use it? Smart home concepts have so far been designed in-house in r&d departments of large companies with very rigid use scenarios or pre-designed environments and technology infrastructures.
Homesense brought the open collaboration methods of online communities to physical infrastructures in the home. Over the course of several months, selected households across Europe had access to the latest in open source hardware and software tools, decided what they want to do with them in the context of their home and shared the results with the world. Local technology experts were selected to support them in the development of their ideas and the whole process from start to finish. The process was documented by users themselves in the form of blogs, videos and images taken throughout a long process that started in the autumn of 2010.
Tinker believed that better scenarios and solutions will emerge when design and research in this area can be conducted in an open way. This breaks from tradition as users, rather than seeing products forced on them by a top-down design process, will create their own smart home and live with those technologies they have themselves developed without prior technical expertise.
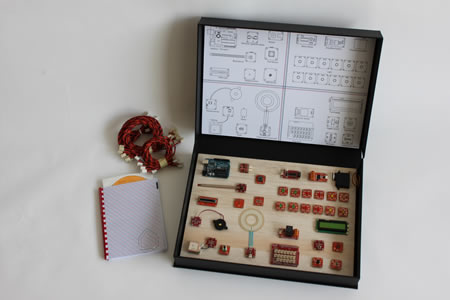
Homesense Kit. Credit: Designswarm, Tinker London, Alexandra Deschamps-Sonsino
In this experiment, the team interviewed home users to help uncover design opportunities to augment their homes and their objects, provided them with a Kit to hack and build highly customized interventions that suited their own personal habits, routines and needs. Finally, they documented the results, reflected on how this informs design for IoT devices, and were later exhibited as part of MOMA’s Talk to Me exhibit
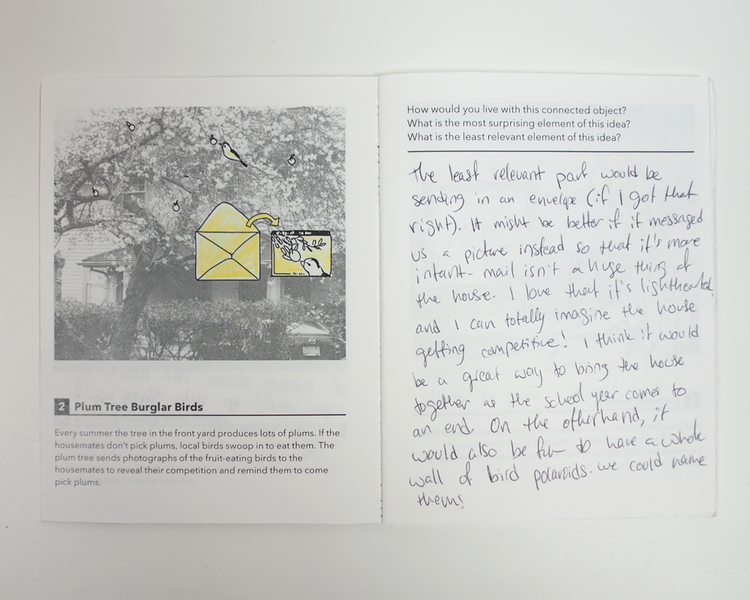
Secondary Precedent: Bespoke Booklets

Similar to the HomeKit, Audrey Desjardins’ developed this method to co-design and explore alternative avenues for IoT in the home. They specificially looked at people who lived in a-typical homes (e.g. boathouses, vans, microapartments) and how the IoT might integrate into their lives. They began by conducting a home visit, including a tour, interview and documentation of their home. This focused on the qualities of each room and how the resident felt about the defining characteristics of their spaces. From there the team would then construct a booklet for each participant using details from the tour. This would include five potential concepts and invite them to respond by writing notes or sketching around each one.
Read more:
- Desjardins, A., Key, C., Biggs, H. R.,& Aschenbeck, K. (2019, June). Bespoke Booklets: A Method for Situated Co-Speculation. In Proceedings of the 2019 on Designing Interactive Systems Conference (pp. 697-709). ACM.
- Desjardins, A., Viny, J. E., Key, C., & Johnston, N. (2019, April). Alternative Avenues for IoT: Designing with Non-Stereotypical Homes. In Proceedings of the 2019 CHI Conference on Human Factors in Computing Systems (p. 351). ACM.
Project Brief and Process
You’re going to emulate these approaches. First, you’ll complete some field work where you’ll co-design with participants in their home. Use this
uilding on your discovery exercise, use the field work in the home to generate a proposal for a tailor-made solution for you chosen subject. You should work from an existing analog object in their home and connect it to the internet in a meaningful way. You’re encouraged to find opportunities for surprising, delightful, magical augmentations of these objects i.e. you are not required to be practical and you should not design a product for the mass market.
Prepare a conceptual design and realize a working prototype of a IoT devices that will coordinate to meaningfully enhance social relationships. As part of this project, you’ll
-
Co-Design - Drawing from the HomeSense Kit, your team will visit the home of one or more potential end users. You’ll interview them, sketch and design concepts, and present back your findings. You should conduct a home tour, take photographs, capture quotes and sketch/speculate on potential connected devices that would be valued and that you could create for them.
-
Conceptual Design: Prepare a concept and/or design a storyboard for an augmented object. As part of this design proposal you should consider ideas of enchantment, ambience, embodiment and tangibility. You should also discuss the role of connectivity in your proposed object (how does it relate to the form; what data will it draw on / generate; how does this create value?) This will be submitted a a sketch or storyboard to Slack and discussed during desk crits.
-
Experience Prototype: Prototype a preliminary version of your device and consider how the device will behave and how networked interactions will take place. This doesn’t have to be a working prototype but an experience prototype that will illustrate the behavior, intended operation and interactions. Your prototype does not need to include live networked interaction using the Particle Cloud but it is strongly encouraged. You will be asked to demonstrate a near final version of the interaction during class.
-
Optional Extra Credit: With a working prototype developed, present your prototype back to your stakeholder. Get feedback on your design by demonstrating your prototype to your ‘client’. As part of this session you should allow them to experience what you’ve created and interact with the device. Ask them about the prototype and if it matches their expectations. Reflect and report on what you learn from debriefing with them.
-
Iterate and Package: As you refine and iterate your prototype in the final week, you’ll also ask how you communicate and present the value that you’ve identified back to the stakeholder you’ve selected. You’ll consider how you might explain, package or market this augmented object. You will also explore the implications of sharing potentially personal data through internet connected devices and develop a statement on what you would do to be responsible in your design should you take this concept forward.
Requirements
This creative assignment is to be completed collaboratively.
Using the tutorials and guides provided you are going to create a experience prototype for an augmented object that:
- Is informed by a co-design process with a real-world end-user
- Builds a sensible relationship between circuits, code and cloud connectivity to meaningfully connect to the internet
- Provides a well realized experience prototype of sufficient quality that it could be tested with/ presented back to the stakeholder
The focus here is on an experience prototype. An experience prototype means that you can demonstrate the intended functionality of the device you propose, but it does not all have to be implemented. In addition, there should be some consideration of the aesthetics and form of the device. You do not have to build a high fidelity form for the object; you are encouraged to hack/repuropse the analog object (if appliable) or create a low-fi enclosure (cardboard, foamcore), to illustrate the outcome. Carefully review the additional precedents below for examples of the kinds of objects you are expected to produce.
You should make sure you have smart use of components and well implemented code that lands at some well thought out functionality.
Grading
Grading standards are as per the outlined guide for Creative Projects
Additional Predents
Below are some projects that illustrate the kind of augmented object you might produce as part of this project. You can also take a look at the MoMa’ Talk to Me exhibit for lots of inspiration
Sean Carney’s DIY weather clock
This DIY device hacks the face of an old antique clock to tell the weather. It connects to online weather information to find out the temperature and conditions for the day ahead; and then presents this using the hands of the original clock. A unique aspect of this is that it gives cherished - but maybe unused - objects in the home new purpose and may fit in better with the texture and decor of you home!
![Vitality’s Sean Carney’s DIY [weather clock]](../images/augmented-objects/weatherclock.png)
Vitality’s Sean Carney’s DIY [weather clock]
NetFlix Socks

Netflix Socks By DeepLocal
We released DIY instructions for Netflix socks on the Make It website and announced the launch through a partnership with Make Magazine. The socks use an accelerometer to detect when a viewer has dozed off and sends a signal to their TV, automatically pausing the show. The socks themselves could be customized with show-inspired patterns making them both knitting and programming savvy. Even those outside the maker community fell in love with the idea. Netflix socks spread like wildfire across social media and press outlets.
Adafruit’s Neopixel Trampoline
](../images/augmented-objects/trampoline.gif)
Adafruit’s Neopixel Trampoline
What do you get when you mix an accelerometer, led strip lighting and a trampoline? This. While not internet connected, it’s a great example of how some simple sensing and output components can augment objects in compelling ways. Of course you could easily extend this to count, log and give feedback on how much exercise someone is getting with each bounce!
Hint: Adafruit’s Learning Guides have LOTS of great examples of augmented objects. Take a look here for more inspiration
](../images/augmented-objects/glowcap.jpg)
Vitality’s Glow Caps
Vitality’s Glow Caps
Vitality’s Glow Caps connect a pill bottle to online calendars and provide a visual cue to if you have taken your medication or if you need to. They light up when it nears the time to take your medication and a home hub, typically left in the kitchen also signals it’s time to take your medicine.
No Place Like Home, GPS shoes
Dominic Wilcox creates a whimsical internet appliance - a pair of shoes to help you find your way home:
](../images/augmented-objects/gpsshoes2.jpg)
Dominic Wilcox’s No Place Like Home, GPS shoes
After uploading your required destination to the shoes via a piece of custom made mapping software and a USB cable, the GPS, which is embedded in the heel, is activated by a heel click. It then communicates to the wearer via a ring of LED lights to point in the required direction.
Objects of Escape - Rocking Chair Prototype
This research group hacked a rocking chair to trigger the playback of sounds when there is movement:
](../images/augmented-objects/rockingchair.jpg)
Tangible Memories’ Objects of Escape - Rocking Chair Prototype
We are exploring how virtual reality technology and interactive furniture can be used as a way for older people to access memories. In the comfort of a rocking chair, using virtual reality goggles or audio speakers, it is possible to experience favourite places and the great outdoors in 3D or in stereo, through 360º images or evocative soundscapes. These journeys of the imagination can rekindle past memories and help to assist reminiscence and storytelling.
The Memory Device
Ishac Bertran’s Memory Device augments the ‘string on the finger’ to help you remember:
Memory Device
“The Memory device reminisces back to a time when people used to tie a string around their fingers, or pin a piece of paper on their clothes, to help them remember something. As opposed to what happens with our phones, the knot or the piece of paper don’t store any information, they are just triggers. Recording is a deliberate action, giving full control over what needs to be remembered and what doesn’t. Inspired by these artifacts I built my own Memory Device.”
Outcome and Process Documentation
-
Problem Statement: Introduce who you are designing for, how they could benefit from an IoT appliance. Why you chose this person, and why did you choose this object to augment
-
Goal: You should be able to clearly what kind of solution are you trying to create and why? How does it address the problem. Explain in as few words as possible.
-
Process: You should maintain a record of your work as it progresses. This should include: components used, photos and videos of the circuits assembled, code (and versions of your code), reflections and challenges encountered, how you solved problems, iterated etc. Be able to tell the story of your work.
-
Outcome: Be able to illustrate the final outcome. Explain how complete the prototypes is and how it works. Your documentation for this section must include:
- Completed code
- A circuit diagram (use Fritzing or similar)
- A list of parts
- A video of your completed project (use in context, operation, etc.)
You are welcome to include illustrative diagrams (workflow, etc.), additional photos, or a concept video.
-
Next Steps: What would you do if you took this project forward and why?
-
Reflection: Reflect on the challenges you encountered and the process as a whole. Did you get where you wanted to? If so, great. If not, why not? What do you need to get there, etc?
Each section should be 200 words max. and well illustrated (images, videos, etc.)
For the Project’s summary description: it must be tweetable - summarise your outcome in no more than 140 characters
Using Online Material:
It is perfectly fine to use examples, code, tutorials, and things you find on the web to help you realize your project. That’s part of the open-source mentality that surrounds much of Making, Arduino and microcontrollers. However, you cannot just copy and paste these solutions. In your documentation you must acknowledge where you got this content from. Include a link to any tutorials, guides, or code that are part of your final solution.
Final Documentation:
You should upload your work to the Gallery. You can sign up at the following link: http://integratedinnovation.xsead.cmu.edu/users/sign_up
Projects should be added to the pool linked above.
To add your project to the pool,
-
first sign up and be logged in
-
Click the ‘Join’ button on the top right
-
You are a member of the pool
-
You will now see an option to: ‘Add a new project to this pool’. Click this to begin adding your project information.
You should provide a clear and concise description of your project, your process, and the outcomes. It should be quick to get an overview of the project. Ideally, your description of the outcomes should be repeatable too i.e. anyone in the class can replicate it easily from the information provided.